13 minutes
Hardware Hacking - Part 1
In the Hardware Hacking challenge, we help Jewel Loggins fix Santa’s Little Helper tool by connecting to a UART interface. For silver, we wire correctly, enable developer mode via DevTools, reconstruct shredded notes with Python, and input the right settings. For gold, we explore the game’s API and use a modified curl request to access a hidden endpoint, bypassing hardware to secure the gold medal!

Link
If you want to play the challenge yourself, you can find it here:
https://2024.holidayhackchallenge.com/
Story line
Let’s start off by talking to the elf:
Hello there! I’m Jewel Loggins.
I hate to trouble you, but I really need some help. Santa’s Little Helper tool isn’t working, and normally, Santa takes care of this… but with him missing, it’s all on me.
I need to connect to the UART interface to get things running, but it’s like the device just refuses to respond every time I try.
I’ve got all the right tools, but I must be overlooking something important. I’ve seen a few elves with similar setups, but everyone’s so busy preparing for Santa’s absence.
If you could guide me through the connection process, I’d be beyond grateful. It’s critical because this interface controls access to our North Pole access cards!
We used to have a note with the serial settings, but apparently, one of Wombley’s elves shredded it! You might want to check with Morcel Nougat—he might have a way to recover it.
Hints
Recon
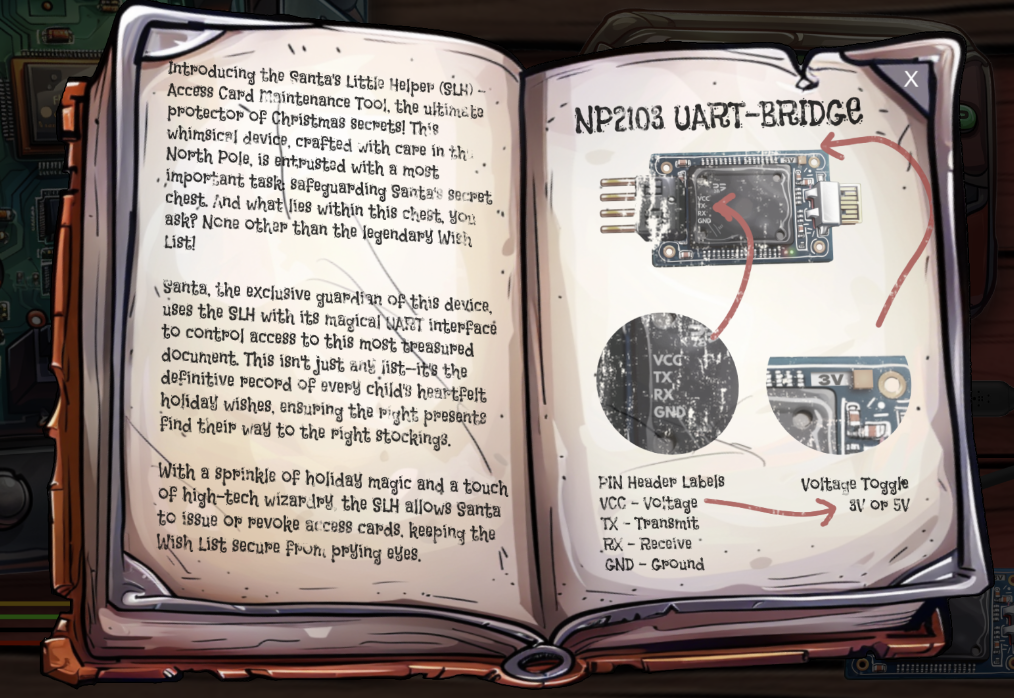
After clicking on the challenge, we’ll get to see some instructions. If we click away the instructions, we’ll also get to see some computer boards.
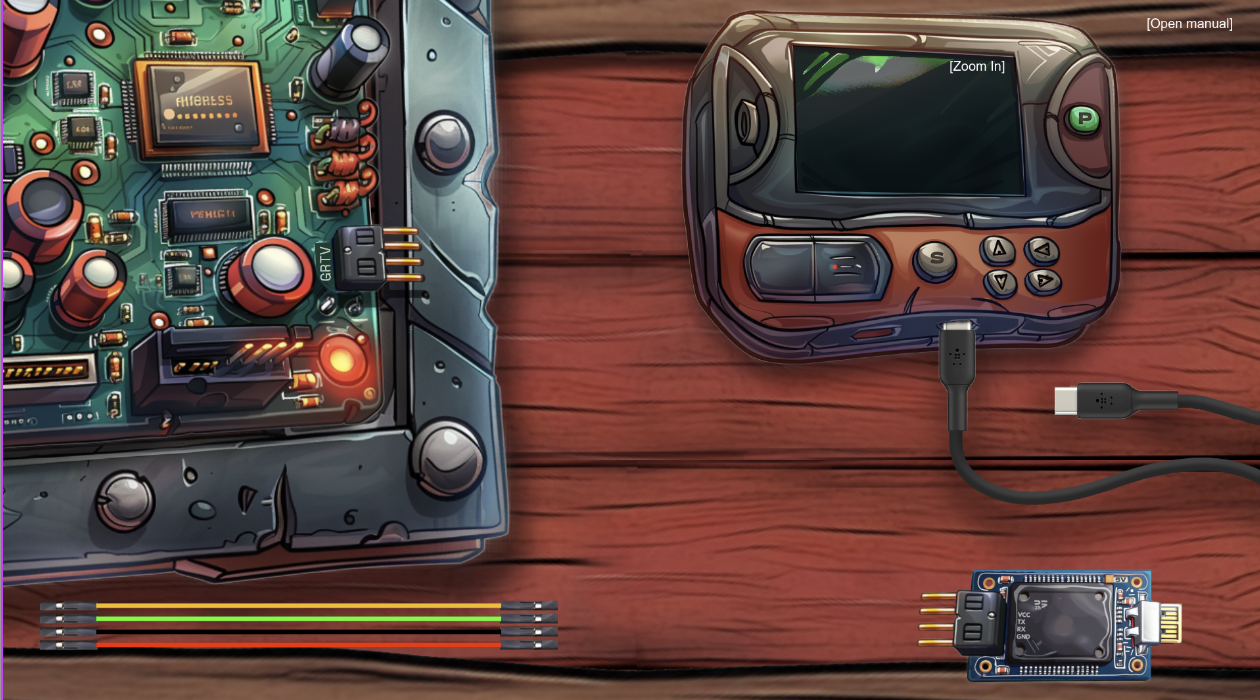
Upon clicking around, we also find that we can click on the buttons of the programmer (top right), and that the cables can be moved by clicking and dragging them to a connection point.
When we start moving the cables and connect them up, the console also shows a message when a correct connection is made. This should help us connect the programmer to the board.
Silver
Let’s start of by connection the wires. If we open the DevTools console, and start connecting a cable, we’ll receive a message like Connected v3 (uVcc) with j1f and j1m when we make a correct connection. This makes it quite easy to find the right wiring, and in the end we get the message All pinned up!.
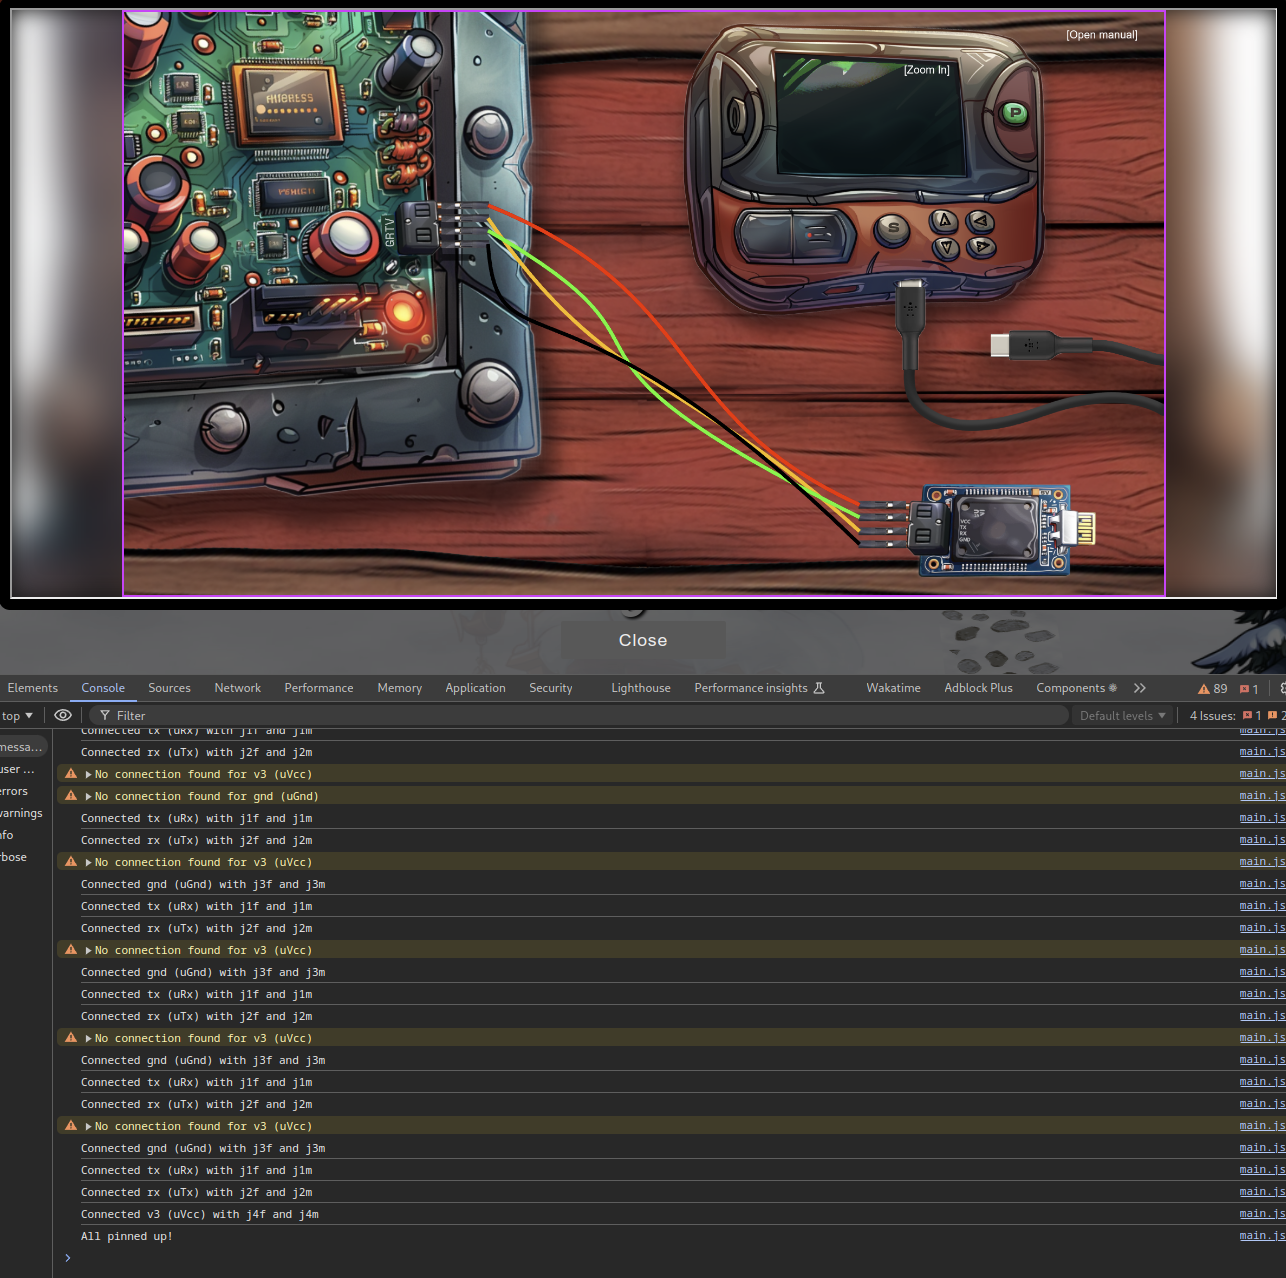
If we now click the power (P) button, and then the start (S) button, we receive new messages:

It looks like more configuration is needed. Let’s explore the code a bit. A good start might be near where these message are coming from. We can navigate there by clicking on the blue text at the end of the lines.
We end up being on the checkConditions function, and at the start of it, we find the following checks:
async checkConditions() {
    if ((this.uV === 3 && this.allConnectedUp && !this.usbIsAtOriginalPosition) || this.dev) {
        // console.log("PARTY TIME");
        let checkIt = await checkit(
            [
                this.currentPortIndex,
                this.currentBaudIndex,
                this.currentParityIndex,
                this.currentDataIndex,
                this.currentStopBitsIndex,
                this.currentFlowControlIndex,
            ],
            this.uV
        );
        // ...
    }
}
It looks like we should set the voltage to 3v, connect all the wiring, connect the usb cable. That, or dev needs to be set to true. Afterwards, we also need to configure some other things, but we’ll get back to that later.
Upon looking at the cabling again, I indeed found that I forgot to connect the USB cable. But, connecting the cable is boring, so let’s enable dev mode, it might help us later.
If you’ve read my previous writeups, you know the drill by now. We first need to connect the DevTools to the iframe. We can do this by clicking on the dropdown menu next to the eye icon, and selecting the option starting with “hhc24-hardwarehacking”. From here we can access the game’s scene, and access it’s properties. Next to the dev variable, let’s also set uV while we’re at it, since that is also passed to the checkit function.
const scene = game.scene.scenes[0];
scene.dev = true;
scene.uV = 3;
If we click the start button now, a popup is shown:

Next, we can close the popup and take a look at the configuration. We open the config by clicking any of the arrow keys on the programmer.
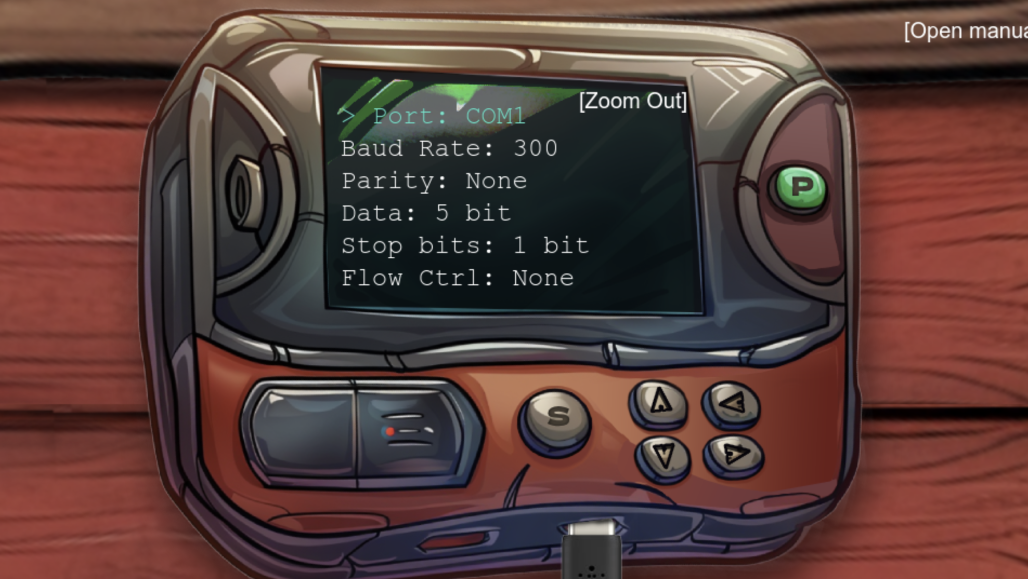
There are too many possible combinations to use brute force, so we need to find a better way. Let’s take another look at what the elf told us. The elf said: “We used to have a note with the serial settings, but apparently, one of Wombley’s elves shredded it!”.
Thinking back of the previous challenge, we found shredded pieces of paper behind the frosty keypad, perhaps we should be using those.
After downloading and extracting shreds.zip, we’ll find it contains 1,000 slices of a picture. Initially, I had no clue how to combine them back together. But, if we go back to the hints, we find a reference to a script called heuristic_edge_detection.py.
import os
import numpy as np
from PIL import Image


def load_images(folder):
    images = []
    filenames = sorted(os.listdir(folder))
    for filename in filenames:
        if filename.endswith(".png") or filename.endswith(".jpg"):
            img = Image.open(os.path.join(folder, filename)).convert("RGB")
            images.append(np.array(img))
    return images


def calculate_difference(slice1, slice2):
    # Calculate the sum of squared differences between the right edge of slice1 and the left edge of slice2
    return np.sum((slice1[:, -1] - slice2[:, 0]) ** 2)


def find_best_match(slices):
    n = len(slices)
    matched_slices = [slices[0]]
    slices.pop(0)

    while slices:
        last_slice = matched_slices[-1]
        differences = [calculate_difference(last_slice, s) for s in slices]
        best_match_index = np.argmin(differences)
        matched_slices.append(slices.pop(best_match_index))

    return matched_slices


def save_image(images, output_path):
    heights, widths, _ = zip(*(i.shape for i in images))

    total_width = sum(widths)
    max_height = max(heights)

    new_image = Image.new("RGB", (total_width, max_height))

    x_offset = 0
    for img in images:
        pil_img = Image.fromarray(img)
        new_image.paste(pil_img, (x_offset, 0))
        x_offset += pil_img.width

    new_image.save(output_path)


def main():
    input_folder = "./slices"
    output_path = "./assembled_image.png"

    slices = load_images(input_folder)
    matched_slices = find_best_match(slices)
    save_image(matched_slices, output_path)


if __name__ == "__main__":
    main()
Maybe this will recreate the correct image for us based on the edges. From reading the bottom part, it seems like we can just place it next to the slices/ folder we extracted from the zip file and run it. Let’s try that:
python heuristic_edge_detection.py
Note: you might get an error message about missing Python packages, in that case, just Google how to install them on your OS.
The script takes a few seconds to run, but afterwards the following image is returned:

The image looks usable now, but there are still a few tweaks needed. It looks mirrored, but also the x-axis is a bit off. We can correct this easily using the PIL Python library (which is also used by heuristic_edge_detection.py). I wrote the following script for this:
from PIL import Image, ImageOps

im = Image.open("assembled_image.png")

xsize, ysize = im.size

delta = 275  # amount to move x-axis

part1 = im.crop((0, 0, delta, ysize))  # take left part
part2 = im.crop((delta, 0, xsize, ysize))  # take right part
im.paste(part1, (xsize - delta, 0, xsize, ysize))  # paste the left part on the right
im.paste(part2, (0, 0, xsize - delta, ysize))  # paste the right part on the left
im = ImageOps.mirror(im)  # mirror image

im.save("output.png")
Which, after running, yields the following resulting image:
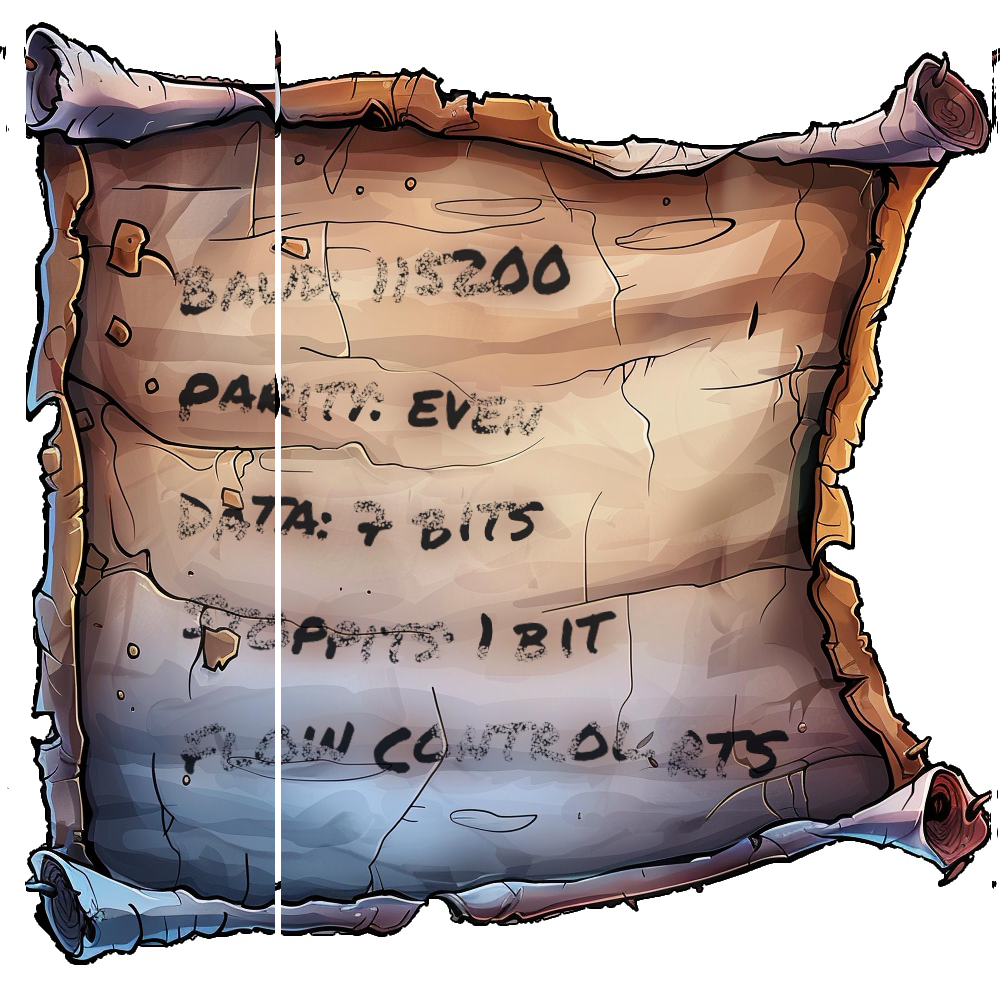
We can now easily read the settings from the image, they are as follows:
| Name | Setting |
|---|---|
| Port | USB0 |
| Baud Rate | 115200 |
| Parity | even |
| Data | 7 bit |
| Stop Bits | 1 bit |
| Flow Control | RTS |
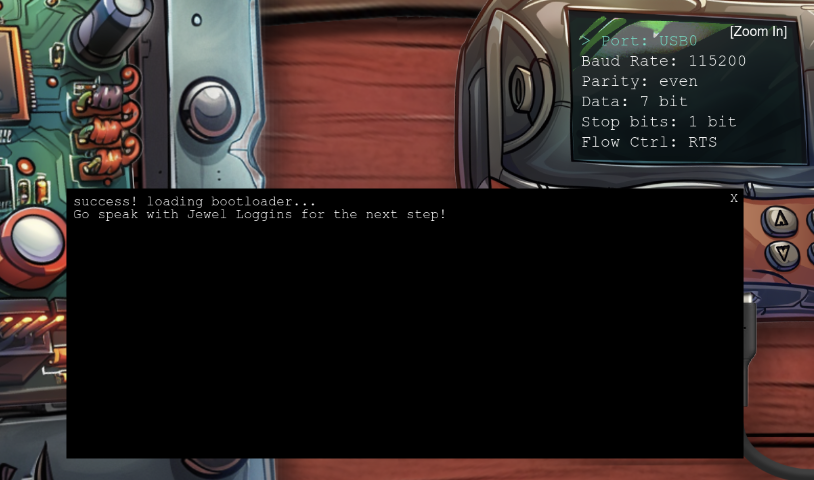
If we then plug these settings into the programmer and click the start button, we get the following popup, and the silver medal!
Gold
Continued story line
Let’s first talk to the elf again, he’ll tell us what we’ll have to do for gold.
Fantastic! You managed to connect to the UART interface—great work with those tricky wires! I couldn’t figure it out myself…
Rumor has it you might be able to bypass the hardware altogether for the gold medal. Why not see if you can find that shortcut?
Exploration
The elf suggests that we should bypass the hardware completely. Let’s explore the inner workings of the code a bit further.
Earlier when checking the checkConditions function in the code, we found references to checkit. Let’s explore a bit further there.
If we navigate to checkit, we find some interesting comments.
async function checkit(serial, uV) {
    // ...

    // Build the URL with the request ID as a query parameter
    // Word on the wire is that some resourceful elves managed to brute-force their way in through the v1 API.
    // We have since updated the API to v2 and v1 "should" be removed by now.
    // const url = new URL(`${window.location.protocol}//${window.location.hostname}:${window.location.port}/api/v1/complete`);
    const url = new URL(
        `${window.location.protocol}//${window.location.hostname}:${window.location.port}/api/v2/complete`
    );

    // ...
}
The mentions of V1 and the emphasis on “should” hint at the v1 endpoint still being active, so let’s test that.
Solving
We can find a valid request from before by navigating to the Network tab in the DevTools, and looking for the final request to “/complete”. Once we’ve found it, we can right-click on the request, go to Copy, and click Copy as cURL.
This will copy a command to our clipboard, which we can modify and execute in a terminal. The command will look something like this:
curl 'https://hhc24-hardwarehacking.holidayhackchallenge.com/api/v2/complete' \
  -H 'accept: */*' \
  -H 'accept-language: en-US,en;q=0.9,nl-NL;q=0.8,nl;q=0.7' \
  -H 'cache-control: no-cache' \
  -H 'content-type: application/json' \
  -H 'cookie: GCLB="#######"; _ga=GA###############' \
  -H 'origin: https://hhc24-hardwarehacking.holidayhackchallenge.com' \
  -H 'pragma: no-cache' \
  -H 'priority: u=1, i' \
  -H 'referer: https://hhc24-hardwarehacking.holidayhackchallenge.com/?&challenge=termHardwareHacking101A&#######################' \
  -H 'sec-ch-ua: "Google Chrome";v="131", "Chromium";v="131", "Not_A Brand";v="24"' \
  -H 'sec-ch-ua-mobile: ?0' \
  -H 'sec-ch-ua-platform: "Linux"' \
  -H 'sec-fetch-dest: empty' \
  -H 'sec-fetch-mode: cors' \
  -H 'sec-fetch-site: same-origin' \
  -H 'user-agent: Mozilla/5.0 (X11; Linux x86_64) AppleWebKit/537.36 (KHTML, like Gecko) Chrome/131.0.0.0 Safari/537.36' \
  --data-raw '{"requestID":"YOUR REQUEST ID","serial":[3,9,2,2,0,3],"voltage":3}'
If we run the command as is, we would solve silver again. But let’s follow the hints, and replace v2 with v1 in the url at the top. Optionally we can also remove the unnecessary headers, so the command will look like this:
curl 'https://hhc24-hardwarehacking.holidayhackchallenge.com/api/v1/complete' \
  --data-raw '{"requestID":"YOUR REQUEST ID","serial":[3,9,2,2,0,3],"voltage":3}'
Once we run it, we receive the gold medal!
Holiday Hack Challengectfhackingwriteup
1721 Words
Unknown
2024-12-30 19:55 +0000
fab68f7 @ 2025-01-05